
Essential Science for Teachers: Life Science
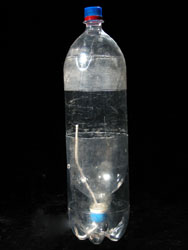
Bottle Biology | Bottle Basics TerrAqua Column
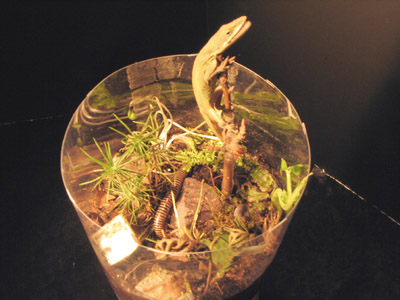
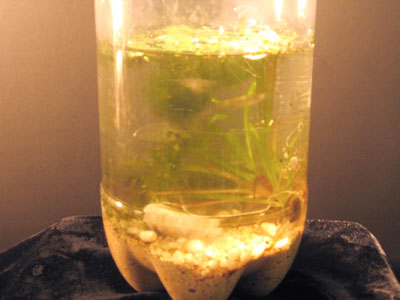
The TerrAqua Column
The TerrAqua Column (see building instructions below) is a bottle system that is composed of terrestrial and aquatic habitats. The terrestrial habitat, or terrarium, houses organisms in soil and above-ground subhabitats. The aquatic habitat, or aquarium, houses floating and submerged organisms, as well as organisms that live on top of or in aquatic sediments. The terrarium and the aquarium are connected to one another through water — the terrarium drains into the aquarium, which, in turn, provides the terrarium with water that is drawn through a wick that runs between the two.
The Life Science TerrAqua Column is designed as a companion to the videos for Session 1 (“What Is Life?”) and Session 2 (“Classifying Living Things”). This system provides opportunities for learning about the characteristics of life by observing living things in their environments over time. It is also well suited for activities that involve distinguishing between organisms based on habitat, the roles they play, or the features that classify them as plants, animals, or other life forms.
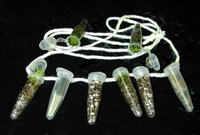
Get a Life Necklace
Life Science suggests several activities for the TerrAqua Column that are excellent introductions to a scientific study of the living world. “Get a Life!” features the “necklace” worn in the video by Bottle Biology creator Paul Williams. In this activity, the challenge is to test whether an object is alive by creating life-sustaining conditions in small tubes that can be worn around the neck.
“Taking Inventory” emphasizes careful description of the living things that are introduced into the system, while “Pondering Change” allows you to keep track of changes in the system over time. “Is It Alive?” parallels an activity seen in Session 1 in LauraJo Kelly’s second-grade classroom where items are classified as living, dead, or nonliving.
The fascinating world of microbes is made visible with “Now You See It.” “What Is It?” provides a systematic approach to classifying living things into the groups that scientists use to organize the living world.
You can follow along online and track your progress with “Is It Alive?” “Now You See It,” and “What Is It?”
For more background information and additional activity ideas, you can visit the Bottle Biology website at www.bottlebiology.org.
Components
Building Your TerrAqua Column
The most basic TerrAqua Column combines a deep base unit with deep funnel and top units. We added an internal unit to the aquarium in our Essential Science for Teachers TerrAqua Column to provide additional viewing and photographing space.
What you stock your TerrAqua Column with involves your goals for study, the sources of your specimens — local or purchased — and your own creativity. The simplest way to stock your Column is to collect from your local environment. Because our goals were to use the TerrAqua Column as a learning tool for the Essential Science for Teachers course, we combined local collections with purchased specimens to make our system particularly diverse.
Activity Accessories
Depending on the activities you choose to do, you may need one or more of the following:
- Get A Life Necklace — for “Get A Life!” activity
- Petri plates with prepared media — for “Now You See It” activity
Build the System: TerrAqua Column
 Materials needed
For Building
- 3 2-liter plastic bottles (bottle 1 provides a deep base and top, bottle 2 provides an internal unit (optional), and bottle 3 provides a deep funnel.)
- 2 bottle caps (for top and deep funnel)
- 1 20-cm length of nylon craft cord (for wick)
- China or non-permanent marker (for making marks)
- Safety razor or utility knife (for starting bottle cuts)
- Scissors (for finishing bottle cuts)
- Soldering iron or drill (for making wick hole in bottle cap)
- Push pin (for making air holes)
For Stocking and Maintaining
It’s very important that all materials introduced into the TerrAqua Column — living, dead, or nonliving — are clean and free of anything that might be toxic to living things (e.g., oil, pesticides, etc.). The organisms you introduce should be small and suited to the habitats you construct. The number of organisms you introduce will depend on what they are but it is generally best to err on the side of adding too few than too many, especially in the aquatic habitat. Bigger organisms should definitely be limited to one or two.
You can download an inventory of aquatic and terrestrial plants and animals (PDF) that Paul Williams has found make good choices. Many varieties can be collected from local environments and most can be purchased from Carolina Biological Supply Company (1- 800–334–5551) or www.carolinabiological.com.
The Bottle Biology Web site is also a resource for materials “custom developed” for bottle systems like this.
Aquatic habitat
- Fine-grained aquarium gravel (provides “bedrock”)
- Sand or topsoil (provides bottom sediment)
- Untreated tap water or distilled water (provides aquatic habitat)
- “Boulders,” “sunken logs,” and other miniature objects typical of a pond bottom
- Aquatic plants and animals
- Fish food (if you include a fish)
Terrestrial habitat
- Fine-grained aquarium gravel (provides “bedrock”)
- Topsoil (provides soil substrate)
- Leaf litter (provides decaying material)
- Terrestrial plants and animals
- “Boulders,” “dead trees,” and other miniature objects typical of a forest habitat
- Food for animals as needed
Building Instructions:
- Following the instructions for making cuts in Bottle Basics, make a deep base unit, deep funnel unit, and top unit. An internal unit for either the aquarium or terrarium is optional.
- Melt or drill a hole in both bottle caps and screw onto the top and deep funnel units.
- Insert the “wick” through the hole in the bottle cap of deep funnel with approximately 10 cm on either side.
- Make air holes at the top of the aquarium and terrarium.
- If you wish to string your system, refer to the instructions for stringing bottles in Bottle Basics.
- The system is assembled by inverting the deep funnel over the deep base and adding the top.
Stocking Instructions
Aquatic habitat
- Add a layer of sand or topsoil (2-3 cm) to the deep base.
- Add a layer of gravel (1-2 cm) on top of the sand or topsoil.
- Add water to a level about 1 cm below the cap of the inverted deep funnel.
- Plant aquatic plants in the bottom sediment. A chopstick or skewer will help you push the stems or roots into the ground.
- Arrange “boulders” and other objects on the bottom sediment.
- Add floating aquatic plants.
- Add aquatic animals.
Terrestrial habitat
- Add a layer (1-2 cm) of gravel to the deep funnel.
- Mix equal parts of leaf litter and topsoil together, moisten, and add a layer (6-8cm) over the gravel.
- Add terrestrial animals that burrow to the soil (e.g., worms).
- Plant terrestrial plants in the soil.
- Arrange “dead trees” and other objects on the soil.
- Add terrestrial animals.
- Establish a “water connection” between the aquatic and terrestrial habitats by holding the terrarium over the aquarium at a slight angle and slowly pouring water down the side of the terrarium until it drips from the “wick” into the aquarium. This is essential to ensure “wicking” action.
Maintenance Instructions
- Provide a light source, preferably indirect window light. A small desk lamp or plant light will work, too. For artificial lights, provide 12 –14 hours of light daily.
- Remove algae weekly. Gather filamentous algae by “spooling” with a toothbrush or tweezers. Remove algae along the sides of the bottle with a paper towel.
- Change the water weekly. Use a turkey baster to remove and replace 25% of the water each week.
- Regularly feed animals that require an external food source.
Build the System: Get a Life Necklace
Get a Life Necklace
Materials needed
For Building
- 1.5 ml plastic microcentrifuge tubes
- necklace of string, cord, or plastic filament
Microcentrifuge tubes can be purchased from Carolina Biological Supply Company (1-800-334-5551) or www.carolinabiological.com.
Building Instructions:
- Select desired number of microcentrifuge tube habitats.
- Open caps and arrange on the necklace.
- Close caps over the string and it’s ready to wear!
Build the System: Petri Plates With Prepared Media
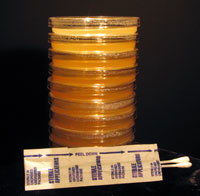 Materials needed For Building
- 1 Package of 10 Petri plates of Trypticase Soy Agar or Nutrient Agar
- 1 Package of sterile swab applicators
Both of the above can be purchased from Carolina Biological Supply Company (1-800–334–5551) or www.carolinabiological.com. Store unused media upside-down in a refrigerator.
Activities
Now that you’ve built the components you need for the TerrAqua system, try these activities to further your understanding. First read the instructions and perform the activity. For selected activities, view an example of our results in Track Our Progress.
- Get a Life!… Test whether an object is alive by creating life-sustaining conditions in small tubes that can be worn around the neck.
- Taking Inventory and Pondering Change… Carefully describe living things, and predict changes in the system over time.
- Is It Alive?… Apply what you learned in Session 1. [track our progress]
- Now You See It… The fascinating world of microbes is made visible. [track our progress]
- What Is It?… Explore a systematic approach to classifying living things into the groups that scientists use to organize the living world.
Activity: Get a Life!
Get a Life Necklace
How can you tell if an object is living? If it is alive, what conditions are essential for its survival? In “Get a Life!”, you’ll have an opportunity to test your ideas by creating tiny habitats to which you introduce objects that puzzle or interest you. Your habitats are strung together in a necklace so that you’ll be right there to observe what happens!
Materials Required
- Get a Life! Necklace
- Get a Life! Data Sheet (PDF)
Instructions
- Collect objects that you wish to test for life. Things that you suspect to be plants, seeds, animals, or eggs make good choices. Your objects must be small enough to introduce into a microcentrifuge tube.
- For each object, determine the conditions that will help you test for life.
- Create these conditions in the appropriate tubes.
- Introduce the objects you’ve chosen into their tubes.
- Wear your Get A Life Necklace!
- Monitor the tubes regularly for signs of life.
- Be sure to sustain the conditions you created in each tube.
Activity Questions
Before you begin
- What are the five characteristics of life?
- Which characteristics do you think you can test for in a microcentrifuge tube?
- How can you test for these characteristics?
- How will you know if you’re observing these characteristics?
- In creating conditions in your tubes, does it matter whether the object is a plant or animal? Why or why not?
After the activity
- What objects did you place in your tubes?
- Which objects did you conclude to be living?
- For each item, what evidence convinced you of this?
- Were there any items for which the evidence was inconclusive?
- How would you modify conditions to try to obtain more conclusive results?
Activity: Taking Inventory and Pondering Change
The TerrAqua Column that you’ve designed includes a variety of aquatic and terrestrial organisms. In a study system like this, it’s important to describe the living things that you stock it with before you introduce them into their habitats. “Taking Inventory” will assist you in doing this, and “Pondering Change” will help you predict changes that you think will occur as your TerrAqua Column develops over time.
Materials Required
- Aquatic and terrestrial organisms to be introduced into your TerrAqua Column
- Taking Inventory Data Sheet (PDF)
- Pondering Change Data Sheet (PDF)
Instructions
Taking Inventory
- Assemble the aquatic and terrestrial organisms to be introduced into your TerrAqua Column.
- Observe each item and identify it with a common and/or scientific name.
- Using your Taking Inventory Data Sheet (PDF), describe identifying and interesting characteristics for each organism.
- Take and record measurements of each organism.
- Make a sketch of each organism, including scale.
- Make a graphic inventory of your TerrAqua Column, showing where each organism is to be placed.
Pondering Change
- Use your Pondering Change Data Sheet (PDF) to make predictions about change in your TerrAqua Column over time.
- Set the length of the study period for your TerrAqua Column.
- At regular intervals during your study period, observe your TerrAqua Column and record changes that occur.
- At the end of your study period, make another graphic inventory.
Activity Questions
At the start of your study period
- What aquatic organisms will you introduce into your TerrAqua column?
- What terrestrial organisms will you introduce?
- Why did you choose these organisms?
- How would you describe diversity in your aquatic habitat? Your terrestrial habitat?
- What do you expect to happen in your aquatic habitat over time? Your terrestrial habitat?
- Do you expect to find “newcomers” in either habitat that you didn’t introduce?
- If so, what do you think these newcomers will be?
- How do you think newcomers might be introduced into each habitat?
At the end of your study period
- What types of changes occurred in your aquatic habitat? Your terrestrial habitat?
- What do you think caused these changes?
- Did you find any newcomers in either habitat? What were they? How did they get there?
- Were there any problems in either habitat?
- How would you change the design of your TerrAqua Column for future studies?
Activity: Is It Alive?
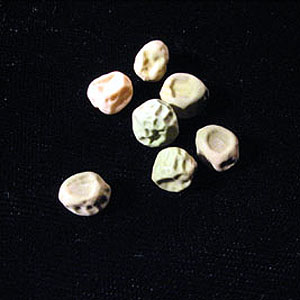
Are these dried peas alive?
As a companion to the Essential Science for Teachers course, the TerrAqua Column is meant to help you apply what you learn during Session 1: What Is Life? To do this, a good TerrAqua Column design will include living, dead, and nonliving components — those that you’ve introduced as well as those that are “included” as part of the bottle system (i.e., the bottles and the air). “Is It Alive?” provides you with an opportunity to classify these items as living, dead, and nonliving using what you’ve learned about the characteristics of life.
Materials Required
- All objects to be introduced into your TerrAqua Column
- Is It Alive? Data Sheet (PDF)
Instructions
- Assemble the objects to be introduced into your TerrAqua Column.
- Observe each object.
- Using your Is It Alive? Data Sheet (PDF), classify each object as living, dead, or nonliving.
- After you’ve stocked your TerrAqua Column, make regular observations of each object and document any changes that occur.
Activity Questions
Before you stock your TerrAqua Column
- What are five characteristics that can be used to define “living”?
- Which can be observed in a living object as it sits in front of you?
- Which can be observed in a living object over time?
- Which items do you currently classify as living?
- What characteristics define “dead”?
- Which can be observed in a dead object sitting in front of you?
- Which can be observed in a dead object over time?
- Which objects do you currently classify as dead?
- What characteristics define “nonliving”?
- Which can be observed in a nonliving object sitting in front of you?
- Which can be observed in a nonliving object over time?
- Which objects do you currently classify as nonliving?
- Which objects are you unsure of?
- What evidence will help you reach conclusions for these objects?
At the End of Your Study Period
- For which objects would you change your classification?
- What happened to change your ideas?
TRACK OUR PROGRESS: Is It Alive?
Activity: Now You See It
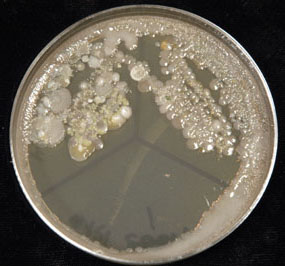
Culture of waterfern (upper left) and moss
(upper right) after seven days
If you could shrink yourself to the size of a microbe, what do you think you’d see in your TerrAqua Column? “Now You See It” helps make the world of microbes observable through cultures that are visible because they’re made of millions — even billions — of individual organisms. This activity uses special materials that support microbial life — Petri plates that contain prepared media, which acts as a food source.
Your cultures will include mostly bacteria and some fungi. Bacteria will generally appear at first as small pinpoint-sized colonies that will grow to become much larger. Two types of fungi may grow. Yeast colonies resemble bacterial colonies, while molds will develop into fuzzy growths. It’s not important that you identify which is which, just that you observe and appreciate what can’t be seen in soil, air, water, and on plants and animals.
Materials Required
- Stocked TerrAqua Column
- Petri plates with prepared media
- Sterile swabs
- Fine point permanent marker
- Now You See It Data Sheet (PDF)
Instructions
- When your Petri plates arrive, be sure not to open the lids. You’ll inadvertently introduce microbes if you do.
- To conserve media and make side-by-side comparisons, use a permanent marker to divide each plate into thirds on both the lid and the bottom.
- Select surfaces to be tested for the presence of microbes. A good variety will include soil, water, air (the surface of the bottle), plants, and animals.
- Write the names of the surfaces you’re testing at the outer edge of the bottom side of the Petri plate (the top may move around). Consider making one of the sections a “control,” which you do not disturb. The control can be used to make comparisons.
- Using a sterile swab for each surface, gently swipe the surface, taking care not to pick up debris.
- Open the Petri plate, and starting at the outer edge, gently make a streak in an “S” shape in the appropriate section. Don’t press hard!
- Replace the lid and tape it closed.
- Turn each plate upside-down to avoid a “rain” of condensation from the lid as the colonies grow.
- Incubate in a warm place.
- Observe microbial growth in your plates over a two-week study period.
Note: It is safe to culture microbes in this way — they grow in a closed container and are types that are already present in the environment. To dispose of the plates, spray with disinfectant solution, seal, and throw away. The only thing to be careful about is opening the plate — each time you do, you may introduce new microbes!
Activity Questions
Before you swab your plates
- What are the distinguishing characteristics of bacteria?
- What are the distinguishing characteristics of fungi?
- Which surfaces do you think harbor these microbes?
- How do you think different surfaces might compare?
- What do you expect to see as colonies develop on your plates?
After your study period
- What surfaces did you test for the presence of microbes?
- Describe the microbial growth that resulted from testing these surfaces.
- How did different surfaces compare?
- Were you surprised by your results? Why?
- What can you conclude about microbial life in your TerrAqua Column?
TRACK OUR PROGRESS: Now You See It
Activity: What Is It?
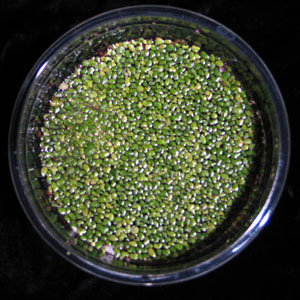
One of the organisms you may identify in “What Is It?”
In Session 2, the focus was on a systematic approach to classifying living things. “What Is It?” is meant to engage you in classifying the organisms in your TerrAqua Column using the strategy for classifying into Domains and Kingdoms that was introduced in the video. In addition, you’ll be able to classify further in the plant and animal kingdoms.
What you’ll be using are “dichotomous keys,” which are used every day by scientists to identify unknown organisms. Dichotomous keys involve “decision points” about an organism, where you have two choices. Each “decision” takes you further in classification. While the organisms in your TerrAqua Column may not be unknown to you, What Is It? will provide good experience in classification.
Materials Required
- Stocked TerrAqua Column
- What Is It? Data Sheet (PDF)
- Dichotomous Keys (PDF)
Instructions
- Observe the organisms in your TerrAqua Column, including those that you introduced and any that are “newcomers.”
- Using your What Is It? Data Sheet (PDF), carefully describe the distinguishing features of each organism.
- Use the Dichotomous Keys (PDF) to classify each organism. Base each “decision point” on your descriptions and what you may already know about each organism.
Activity Questions
- What characteristics of cells can be used to classify organisms into domains and kingdoms?
- What are the domains and kingdoms explored in Session 2: Classifying Living Things?
- What features are used to classify organisms into each domain? Each kingdom?
- Which Domains are represented in your TerrAqua Column? Which kingdoms?
- Within the plant kingdom, which divisions are represented?
- Within the animal kingdom, which phyla are represented?
- How many different types of organisms live in your aquatic habitat? Your terrestrial habitat?
- What can you conclude about diversity in your TerrAqua Column?
Track Our Progress
Get a glimpse of our system at various points in selected activities. Remember that every system is unique: don’t expect yours to look exactly like ours!
- Is It Alive?
- What Is It?
- Now You See It
Track Our Progress: What Is It?
Click on one of the pictures below to see an enlargement of the terrestrial or aquatic habitats of our TerrAqua system, then click on any of the question marks on those enlargements to see a close-up of the component being pointed to. See the What Is It? activity instructions for questions to consider, and use the What Is It? Data Sheet (PDF) to classify each component. If you need help, the TerrAqua Column Organisms Information Sheet (PDF) may be useful.
Note: Because our goals were to use the TerrAqua Column as a learning tool for your Essential Science for Teachers course, we combined local collections with purchased specimens to make our system particularly diverse; your components, of course, may differ.