
Essential Science for Teachers: Life Science
Bottle Biology | Bottle Basics
Bottle Basics
Bottle Biology uses recyclable containers as building blocks that can be put together to form any number of bottle systems to explore science, nature, and the environment.
In Life Science you are invited to choose from four Bottle Biology systems. Each has been designed to provide applications and extension activities for the topics being addressed in the sequential pairs of sessions that compose the course.
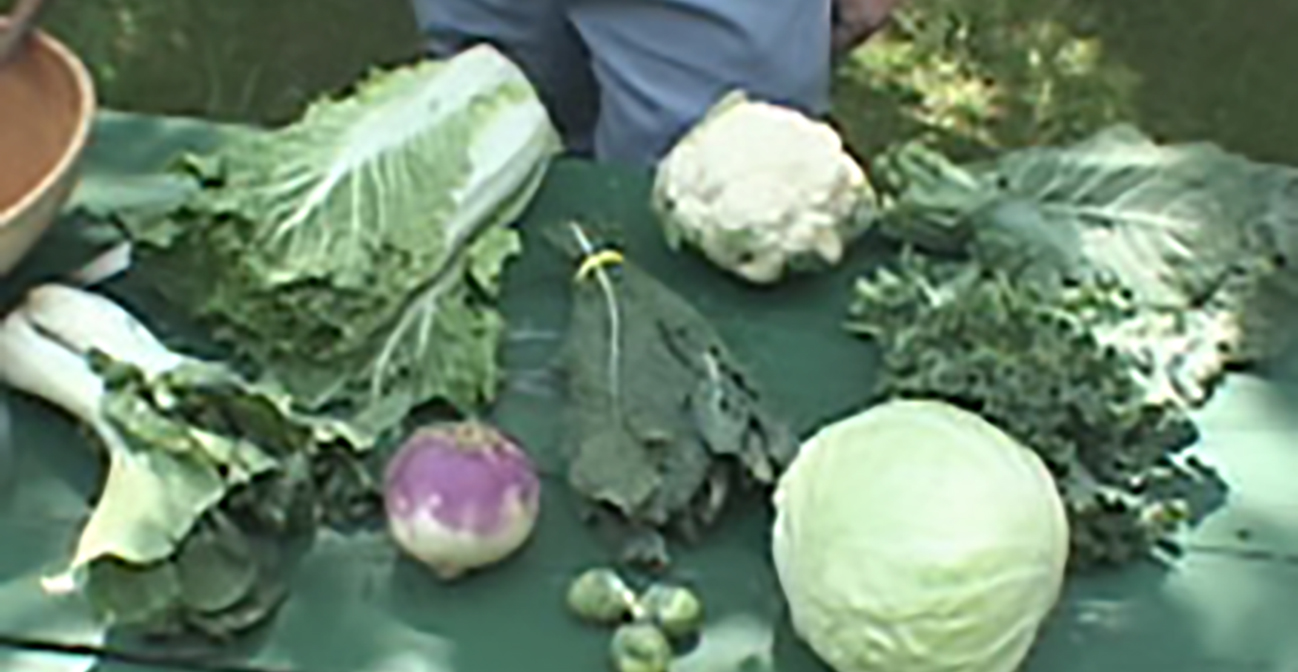
The “TerrAqua Column” has been designed as a companion to Sessions 1 and 2, reinforcing concepts related to defining life and classifying living things. Sessions 3 and 4 focus upon animal and plant life cycles. The “Brassica & Butterfly System” allows firsthand experience with plant and animal life cycles that are intertwined. The basics of biological evolution are addressed in Sessions 5 and 6. Using the “Field Population System,” you can do an experiment that demonstrates how evolution works. Sessions 7 and 8 explore interdependence in the living world. The “EcoColumn” offers a way of exploring large-scale concepts at a “bottle-sized” scale.
During the first two weeks of your course, you should choose one of the systems, assemble the necessary bottle materials, construct the system involved, gather the living and habitat materials you’ll need, and stock your system. By the end of the second week, your system should be stocked and ready to go.
After that, you should select from the activities suggested for each system on this Web site. You can use our discussion board to share your experiences with your colleagues. We have also set up these same systems and done some of the suggested activities. You can track our progress and compare it to your own.
For general information about Bottle Biology visit www.bottlebiology.org.
Bottle Anatomy
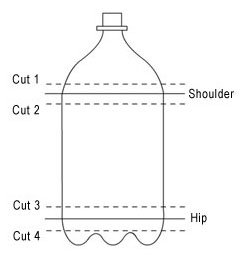
 The most important parts of the bottle to notice are the “shoulder” and the “hip”. These points are where the bottle begins to narrow at the top and the bottom, and are where bottles are fit together.
Generally, you will cut bottles just below or above the shoulder or hip, depending on the system you ’re building.
Because the diameters of bottles from different brands may vary (Coke vs. Pepsi, for example), it’s a good idea to construct any one bottle using only one brand.
Removing the Skin
You’ll need a hairdryer to remove the skin:
- Leave the cap on or fill the bottle with water to prevent warping.
- Hold the bottle between your thighs so you have one hand free for the hairdryer and one free to pull the label off.
- Set the hairdryer on low.
- Hold the bottle about 10 cm from the blowing nozzle, and move it rapidly up and down so the air warms the seam of the label. Keep the nozzle moving so the bottle doesn’t overheat and warp.
- Gently pull on an edge of the label until you feel the glue begin to give. Then pull the label off!
Cutting Bottles
- Draw all your cutting lines first. Wax (china) pencils work well because they don’t smear and can easily be removed. Use a permanent marker if you want lines that last.
- It’s helpful to use a box lid (like a paper box lid) to aid with marking. You can steady the bottle along one side, and then hold your marker in one place while rolling the bottle around to make the mark.
- Use a safety razor or utility knife to begin your bottle cuts. Finish the cut with scissors. For some reason the bottles cut better with the top arm of the scissors inside the bottle. Snip away ragged edges once the bottle is in pieces.
 Basic Cuts
There are four places where bottles are usually cut:
- Above the shoulder
- Below the shoulder
- Above the hip
- Below the hip
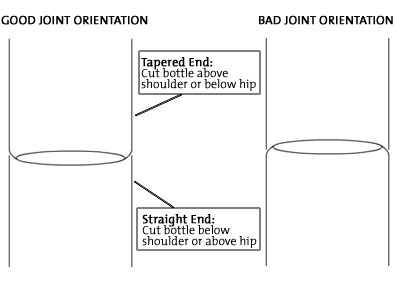
To make tapered ends, cut above the shoulder (Cut 1) or below the hip (Cut 4). To make straight ends, cut below the shoulder (Cut 2) or above the hip (Cut 3).
Joining Bottles
To put two bottles together to make a joint, you need one bottle with a tapered end, and one bottle with a straight end. The tapered end should be the upper bottle, and the straight end should be the lower bottle.
Bottle Building Blocks
There are several basic bottle building blocks that can be used variously, depending on the bottle system you’re building. These units are made by cutting bottles in different ways, as shown in illustrations A-F below.

Stringing Bottles
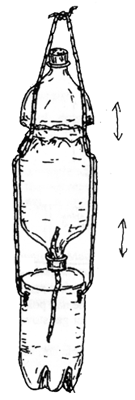 Bottle columns do not have to be strung and hung up but there are several advantages to doing so. By stringing bottles, you can:
- access different segments of your system more easily;
- stabilize your system and hold joints together better;
- transport your system more easily; and
- increase the chances that kids and/or pets will not knock your system over.
-
- Use a soldering iron (a hole punch works too, but holes are more prone to ripping out) to make holes on each side of the bottle above and below each joint.
- String nylon craft cord (string works too but is prone to decaying if it stays wet a long time) up one side and down the other, alternating between from outside in and from inside out.
Making Air Holes
Air holes are part of the design of your bottle system. The number, sizes, and shapes will depend on what you’re using your system for. In general, you’ll need to make air holes to provide adequate ventilation for plants, insects, and other life. And, it’s important that the holes be small enough to keep fruit flies and other small insects inside your system. One thing to remember is that the more holes you have, the faster the contents of your system will dry out, and the more you’ll need to provide water.
There are multiple ways to make air holes. Find the way that works best for you.
Method 1: Nail Poke
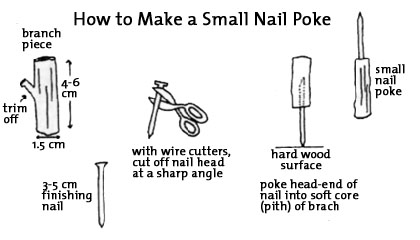
Using a nail poke
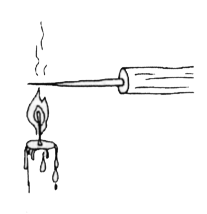
- Heat the nail poke in a flame – candle, propane torch, or gas stove.
- While it is hot, use the poke to make holes in the bottle.
Method II: Push pin
Simply push the push pin through the bottle being careful not to push so fast or hard that you crush the bottle.
Method III: Soldering Iron
Push just the very tip of the heated soldering iron through the bottle. Be careful to barely touch the bottle so that the holes are small enough to contain the organisms within.
Making Holes in Bottle Caps
- Use a soldering iron or a drill for big holes for wicks and holes for insects to move through.
- Use a hot nail poke for small holes for air ventilation or water drainage.